If you’re someone who creates online courses, teaches classes, or does training, and wants people who are actually dedicated and are able to pay money to take your lessons, then this article would definitely be of interest to you. This is an important aspect because instead of giving away a certification exam for free, you charge people for it, and it increases credibility.
In this guide, we will cover how to set up a paid quiz in WordPress using Quiz Maker by AYS, including the different payment models available and how to connect PayPal and Stripe.
What Is a Paid Quiz?
The name of this type says it all; it’s a quiz that requires payment at some point in the process, rather than being free to take from start to finish.
Quiz Maker plugin supports two core models for charging for a quiz:
1) Prepay – this is when the user must pay before they’re allowed to start the quiz at all.
2) Postpay – in this model, the user can take the quiz for free, but has to pay to see their results or receive a certificate.
Choosing which one to choose really depends on how much trust your brand already has.
Prepay can work great if people already know your content, your brand, and can freely pay before completing the quiz. Postpay, on the other way ower the barrier to entry by letting someone experience the quiz first; this can work better if you’re building trust with a newer audience. One thing to know: Postpay only supports one-time payment, not subscriptions.
One thing I would always recommend is to mention beforehand that the users cant see their results without paying for it. This happened to me a lot of times, when I would spent a lot of time completing a quiz ( mostly personality ones), and couldn’t see my results because I had to pay for it, it always feels very frustrating, because If I knew about it, I might have just not taken the quiz.
Besides these 2 prepay/postpay models, Quiz Maker plugin supports a few different payment structures:
- One-time payment , this is when one gets charged each time the quiz is taken
- Lifetime access , this a single payment that gives permanent access to the taker
- Subscription, a recurring payment for a limited period (can be a day, month, or year)
A thing worth mentioning, is that PayPal and Stripe integrations are only available in the Developer or Agency versions of the plugin, unfortunately the free version doesn’t include payment processing. Check our Quiz Maker pricing page to learn more.
Before we get into the setup, you can try our online Paid Quiz Demo (PayPal), to see how it works from the exam taker’s perspective.
How to create a Paid Quiz in WordPress using Quiz Maker plugin
Here is a step-by-step guide of how to create a paid quiz using Quiz Maker plugin by AYS. If you want a video guide, you can also check our Youtube Vidoe on How to Create Paid Quiz on WordPress
Step 1: Create Your Questions and Quiz First
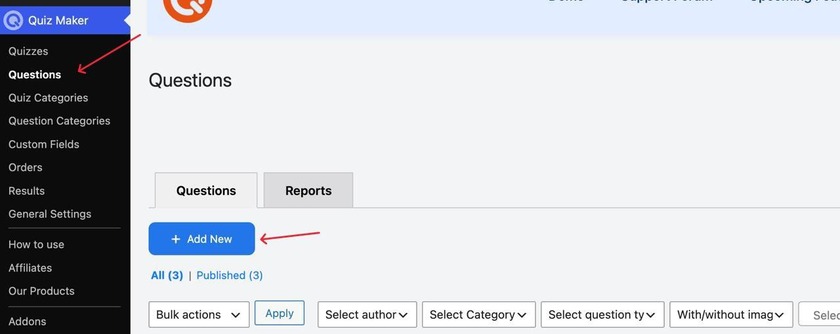
Before adjusting any payment settings, build your questions and add them to your quiz as usual. To add new questions, you will have to follow these steps: click the Quiz Maker icon on your left sidebar, choose Questions, and click Add New as it’s shown in the screenshot below.
Step 2: Go to the Quiz Integrations Tab
After you’re doing with creating your questions and adding them in your quiz, you will have to go to the quiz Integrations tab, shown in the screenshot below.
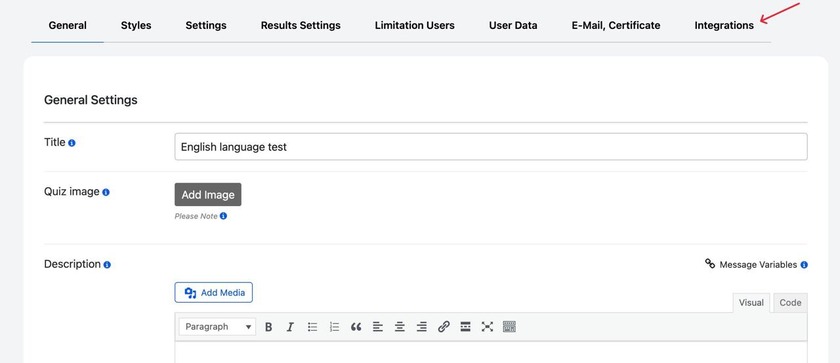
This is the tab that will open, and you’ll see the whole list of third party apps that you can connect your quiz with, including PayPal and Stripe.
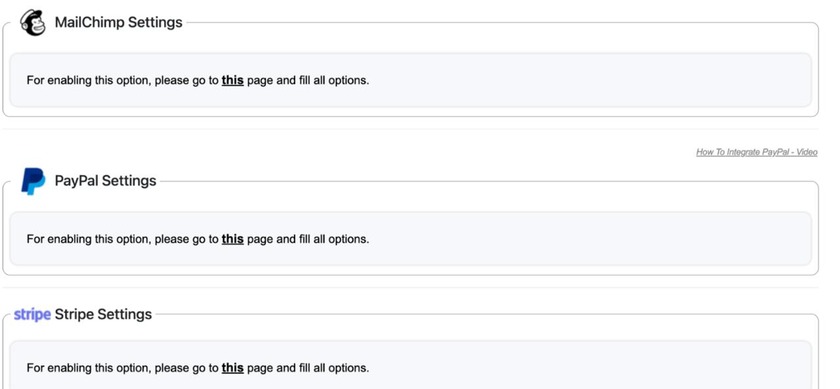
As you can see the the settings are not enabled yet, for enabling you would have to click the “ this” button under each app, and you will see the page where you actually would do the payment adjustments.
Step 3: Choose PayPal or Stripe
For PayPal:
- Register a PayPal developer account
- Create an app inside that account to generate a Client ID
- Paste the Client ID into Quiz Maker’s plugin settings
For Stripe:
- Get your Publishable Key and Secret Key from the Stripe developer dashboard, under API Keys
- Paste both keys into the corresponding fields in Quiz Maker’s general settings
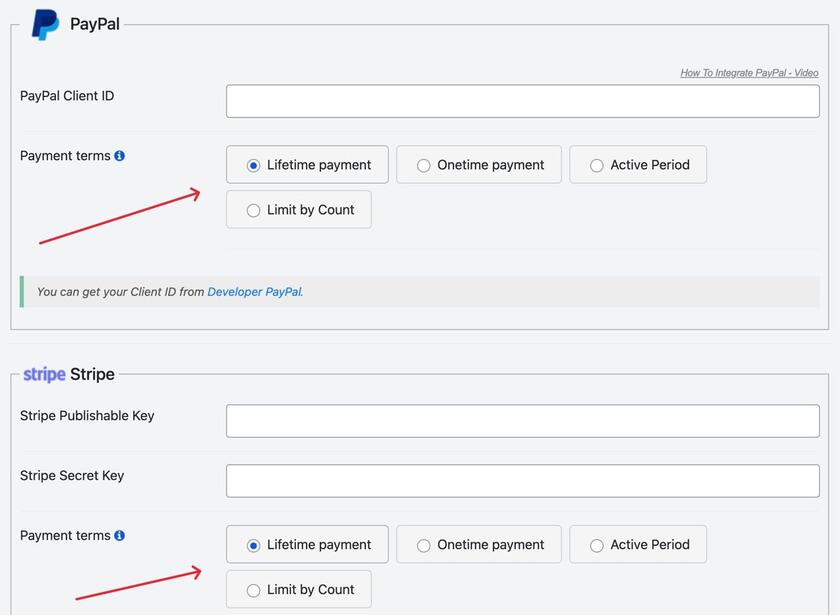
In this shown section, you can choose from the payment structures we discussed before.
Step 4. Fill the payment details
Once you paste your PayPal Client ID from your PayPal Developer account, you should click save, and go back to the quiz Integrations section, and click save as well.
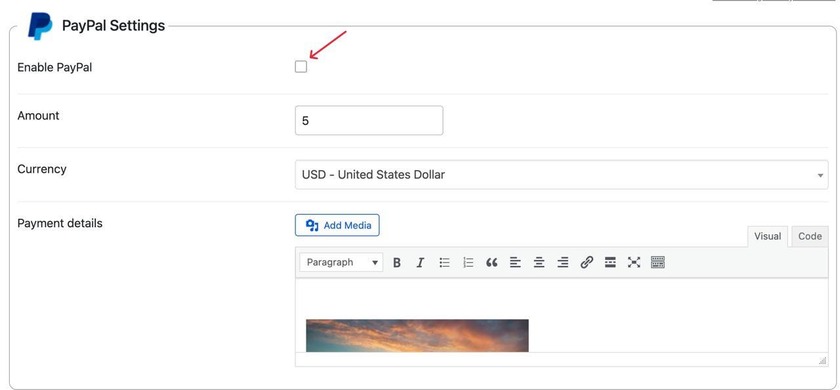
After that we would see the following on our screen, and click Enable Paypal, and fill out the necessary payment details.
You can choose the currency you want, and put some other details as well.
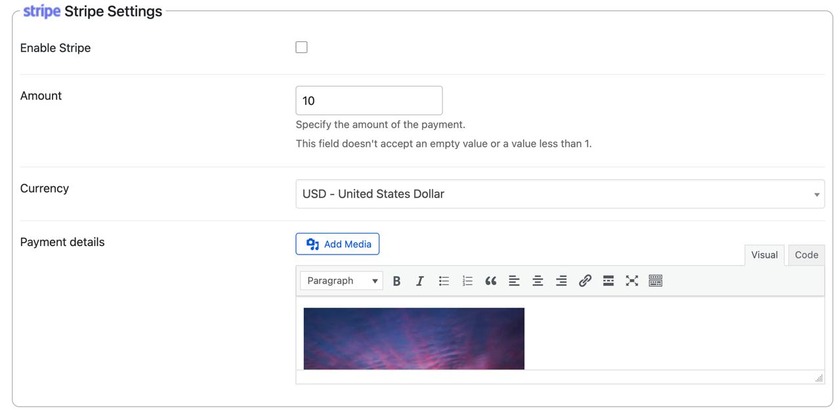
The exact some process works for Stripe settings as well
Step 5. Save the settings
Once you’re done filling out all the payment details, you would have to save all the setting, and that’s it, you just created your first paid quiz.
Here is what the final result would look like using PayPal

And here is how the Stripe integration will look like;

PayPal payment options
| Payment Type | Description | Notes |
| Lifetime payment | One-time payment, permanent access | Works only for registered users |
| One-time payment | Charged each time the quiz is taken | Extra security check available |
| Subscription | Recurring charge for a set period (day, month, year) | Access is tied to login and expires when the subscription lapses |
Stripe payment options
| Payment Type | Description |
| Lifetime payment | One-time payment, permanent access |
| One-time payment | Charged each time the quiz is taken |
Best Practices for Paid Quizzes
- Test with a small payment first
Before setting your final price, test the whole process with a small payment. Make sure the payment, quiz access, and results all work properly. Not only in paid quizzes case, but every time you built a quiz, it’s important to review before publishing, to make sure everything works appropriately. - Choose a payment option your audience will trust
If your audience doesn’t know your brand well yet, letting them take the quiz for free and pay later for the certificate or results may feel easier than asking them to pay before starting, cause most of the people won’t really trust a company that they’ve just heard about. - Use the extra security option if you want to prevent free retakes
Without this setting, someone might refresh the page during the quiz and take it again without paying. The extra security check helps prevent this when using PayPal.
Frequently Asked Questions (FAQ): Paid Quizzes in WordPress
- Do I need a paid version of Quiz Maker to charge for quizzes?
Yes. PayPal and Stripe integrations are only available in the Developer or Agency plugin packages the free version doesn’t include payment processing.
- What’s the difference between prepay and postpay?
Prepay requires payment before the user can start the quiz. Postpay lets them take it for free but requires payment to see their results or receive a certificate. Postpay only supports one-time payment, not subscriptions.
- Can I offer a subscription for quiz access?
Yes, but only through PayPal. Stripe currently supports one-time and lifetime payments only, not subscriptions.
- What happens if someone refreshes the page mid-quiz?
By default, they may be able to get back in without paying again. Turning on the extra security check (available for PayPal payments) requires them to pay again if they interrupt and refresh.
A paid quiz turns knowledge you already have, can be a certification test, a skills assessment, a training exam into a direct source of revenue, without needing a separate e-commerce plugin or checkout system. Quiz Maker by AYS handles the payment logic, the access control, and the display options in just one place, as long as you’re on the Developer or Agency version to unlock PayPal and Stripe integration.
If you have useful content that people would be willing to pay to test themselves on, a prepay or postpay quiz is an easy way to start making money from it. First, test the quiz with a small payment to make sure everything works, then increase the price once you know the process is working the way you want.