In this article, we will discuss the options for the Quiz Settings tab of a particular quiz in the WordPress Quiz Plugin.
For starters, here is a brief guide on how to create a quiz with the plugin.
Primary Setting #
In Primary settings, we have many setting options for our quiz, so let’s cover them one by one.
- Status
Here, we have two checkboxes: Published and Unpublished. Ticking the Published option will keep your quiz active, and by ticking the Unpublished option, your quiz won’t be visible on your website.
- Create a post for a quiz
This option is for automatically publishing your quiz. To do so, you need to tick the Create post for quiz option and choose a post category if needed. Then you have to Save your quiz.
After refreshing the page, the View Post and Edit Post buttons will appear. Click on the first button to view the quiz or on the second button to edit the created post.


For the manual publishing option, explore the article on how to publish a quiz.
- Enable Timer
You can set a timer either for the whole quiz or for questions by enabling the Enable Timer option.
Choose the Quiz Timer checkbox if you want to set a time limit for completing your quiz. Write down the number of seconds of the time limit in the Timer seconds field. After the time is over, the quiz will automatically end.
In the following field, fill in the message that will be shown next to the timer during the quiz (before the timer.)
Next, write a message to show before starting a quiz. That can be, for example, an alert about the following timer’s presence. Then, you can write a message after the timer ends.
By ticking the Show timer on the page tab option, the timer will be displayed above the questions during the quiz. By ticking the Turn on warning option, the color of the timer will change to red after 90% of the time passes.


Choose the Question Timer checkbox instead if you want to set a timer for questions. Adjust the fields in the same way as in the Quiz Timer checkbox.
- Enable randomize questions
By ticking this checkbox, your quiz questions will be displayed in random order with every quiz attempt.
- Enable randomize answers
By ticking this checkbox, the order of the answers will be random every time.
- Enable question bank
Enabling this option lets you randomly display your preferred number of questions out of your chosen questions. Those questions can be selected either from all questions (General) or from each category of questions (By Category.) Then type the number of questions that you want to display.

- Group questions by category
If you choose to group your questions by category, you will also have the option to number the questions by category. This means the numbering will start from 1 for each category.
- Show correct answers
By enabling this option, the correct answers to questions will be shown immediately. That is, the chosen answer of the user will turn green if it’s correct, or red if incorrect.
Moreover, you can choose the duration of showing the right/wrong answers before moving on.
In the next field, check the finish the quiz after one incorrect answer checkbox to end the quiz right after the user answers wrong to one question, or inform the users when the next question is going to start.
Tick the Show only the wrong answers checkbox to highlight the chosen answer of the user only if it’s incorrect (to show it is wrong.)

- Display all questions on one page
If you enable this option, all the questions are going to be on the same page.
- Question count per page
This option allows you to choose a number of questions for each page.
You can choose General if each page will have the same amount of questions or Custom if the number will be different for each page.

- Enable manual grading
If this option is enabled, quiz submissions requiring evaluation, for example, long text answers, can be reviewed and graded manually. After assigning points, you can finalize the score and publish the results.
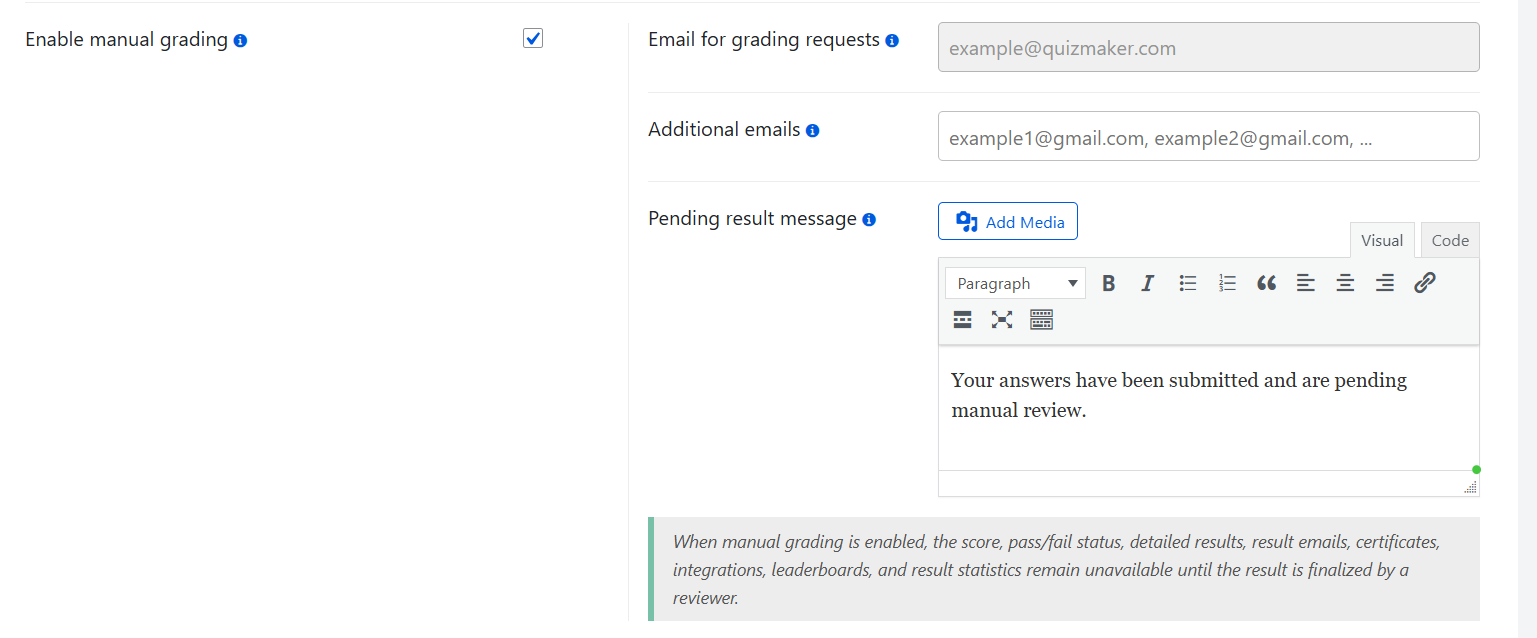
By enabling this option, you will be able to:
- Add Email for grading requests – That is the admin will be able to receive emails as soon as there is a submission which needs to be reviewed.
- Add Additional emails – Enter one or more email addresses to receive manual grading review notifications. Use commas to separate multiple addresses.
- Set a Pending result message – Here you can write a message, which will be displayed at the end of the quiz, so that the users know that they will receive their grades after the review.
If manual grading is enabled, all quiz results and related actions remain pending until the submission is reviewed and finalized manually. This includes the score, pass/fail status, detailed results, emails, certificates, integrations, leaderboards, and result statistics.
When the manual grading option is activated, as soon as the users submit their quizzes, the admin can see all the pending grading in the Results tab. So, for manually grading the tests, you must go to the Results tab > particular quiz > find the quizzes with the Pending status > open the Detailed Report. Here you will be able to finalize the results and send them to the users.
- Enable navigation bar
If you haven’t chosen the Display all questions on one page option, you can enable the navigation bar, and it will make it easier for the users to move between questions.
You can set the Navigation position with the following available options: Top, Left, Right, Bottom.
- Schedule the quiz
Enable this option, and your quiz will be available in your chosen period of time. The Show timer checkbox is used either to show a countdown before the start date or to show the date itself. You can choose the Timezone of the date. Also, write messages to be displayed before the start date or after the expiration of the quiz.

- Make the questions required
By ticking this option, the user can’t go forward without answering all the questions.
- Show question explanation
For this option, you need to enable the Show correct answers option and add an explanation text from the Edit page for a particular question.
- Questions numbering
This option allows you to choose the numbering style of the questions.
- Enable copy protection
After enabling this option, the users can’t use the copy feature.
- Show question category
The categories of questions will be displayed once you enable this option. If you’ve enabled it, you can also choose to show the descriptions of the categories.
- Show question tags
Enable this option to display the questions’ tags.
To create tags, go to Question categories > Tags > Add New. Then, add them to the questions.
- Enable text to speech
By enabling this option, an icon will appear near the question so the users can listen to the question. You can also choose the language of the speech.
- Payment Type
Here, you can choose the payment type: prepay or postpay (if applicable.)
- Quiz Display Page URL
Here, you can paste the URL of the page where your quiz is displayed.
- Enable full-screen mode
By enabling this option, an icon will appear in the upper right corner of the quiz. The users can use it to enter full-screen mode.
- Hint icon
You can enable the hint icon, which can be set by Default or Custom text. For the hint icon button to work, you need to add the corresponding text from the Edit page of the particular question.
You can also change the text written on the button with the Button suboption.
Here is a tutorial on how to Add Hints and Question Explanations.
Answer Settings #

- Answers numbering
This option allows you to choose a numbering style for the questions.
- Show messages for right/wrong answers
Here, you can choose whether you want the messages right/wrong answers to be shown during the quiz, on the results page, or on both.
For this option to work, you need to enable the Show Correct Answers option from the Settings Tab and add the corresponding texts from the Edit Page of the corresponding question.
- Disable input focusing
If you enable this option, the keyboard will not be focused when clicking on the Next button.
Start Page #
- Show quiz head information
With this option, you can choose to show the Title and the Description on the quiz’s Start Page.
- Show passed users count
Enable this option to display how many users pass the quiz.
- Show quiz category
Enable this option to display the quiz category. Moreover, you can choose to display the description of the quiz category.
- Show average rate
This option enables you to display the average rate at the bottom of the Start Page.
- Show quiz author
Enable this option to display the author of the quiz.
- Show creation date
Enable this option to display the quiz creation date.
- Change current quiz creation date
With this option, you can change the creation date and enable the previous option to show it on the Start Page.

- Enable autostart
By enabling this option, the quiz will start immediately after the page is fully loaded. If there are multiple quizzes on one page, the one located on the top will start. Please note that autoplay of background sound will not work for the quiz with this option enabled.
Button Settings #
- Enable next button
Enable to show the Next button.
- Enable previous button
Enable to show the Previous button.
- Enable finish button
Enable to show the Finish button. You can also choose to enable the confirm box for the Finish button.
- Enable clear answer button
Enable to show the Clear answer button.
- Enable to go next by pressing Enter key
This option allows you to move to the next question by pressing the Enter key.
- Use arrows instead of buttons
Enable this option to choose arrows with your preferred style instead of buttons.

- Display messages before the buttons
If you enable this option, the texts of the following options will be shown before the buttons: Message for the right/wrong answers, Question Explanation, and Show correct answers.
- Enable custom texts for buttons
With this option, you can change the names of the buttons with any custom text.

- Enable Keyboard Navigation
Enable this option to allow movement between answer options, tick answers, or move to the next question with the keyboard.
Advanced Settings #
- Enable audio autoplay
If you enable this option, the audio that is put on the question will automatically start to play.
- Enable live progress bar
Enable this option to show the current state of the user passing the quiz.
- Use RTL Direction
This option enables the right-to-left direction for the text and is used mainly in the case of the Arabic Language.
- Change the author of the current quiz
Choose the author of the quiz with this option.
- Show questions counter
Enable this option to show the number of each question and the number of total questions (for example, 2/5.)
- Question Image Zoom
This option allows you to zoom in on the images of the questions.
- Enable confirmation box for leaving the page
By enabling this option, a confirmation popup will appear when the user tries to leave the page.
- Enable confirmation box for the See Result button
By enabling this option, a confirmation popup will appear when the user clicks on the See Result button.
- Enable sounds for right/wrong answers
Tick this option to enable sounds for right or wrong answers. You can select those sounds from the General Settings page of the Quiz Maker Plugin.
- Enable Background music
Tick this option to choose background music for your quiz.

- Enable question reporting
By enabling this option, users can report questions about their concerns. You can also choose to send an email to the author about the report.
- Allow exporting quizzes
When enabling this option, you can choose the users to whom you want permission to export the quiz (in PDF format).

- Embed code
Copy the given iframe link and paste it to another website to put the quiz on your desired page.
That’s it; those were all the options in the Primary Settings Tab.


How do I get it so I can email the results to a user who isn’t logged in? I need them to input their email address If they have passed the quiz, for this to happen?
Dear Dee,
Thank you for your comment.
Apologies for the late response – weekends are non-working days for us.
In the quiz settings you can go to the User Data tab.
See the screenshot here: https://imgur.com/a/MuETimR
There you will find the Information Form, which is disabled by default.
You need to enable it according to your preference and then choose Before Quiz or After Quiz. This means the system will ask for the users email either before starting the quiz or after finishing the quiz but before showing the results.
After choosing this option you will see Available fields and Active fields.
In the Available fields the email field is there by default. You need to double click it or drag it into the Active fields section and then save.
See the screenshot here: https://imgur.com/a/eHzCEYy
After that you can go to the E-mail Certificate tab and enable the Send email to user option and write the email content as needed.
See the screenshot here: https://imgur.com/a/OWldnKz
Also please note that you can create your own fields inside the User Data tab. By default the required fields are there but if you need any additional information you can add a new one from the Custom Fields submenu.
See the screenshot here: https://imgur.com/a/uw2f5dd
And then that new field will also appear in the Available fields so you can activate it if needed.
Please let us know if this helped you.
Thanks!